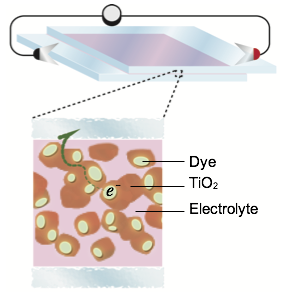
In this lab you will synthesize a porphyrin dye, a synthetic analog of chlorophyll, that will act as the light harvester in the cell. You will then construct a DSSC by anchoring your synthesized dye to a layer of TiO2 on the surface of a conductive glass slide. A carbon catalyst at the counter electrode and iodide/triiodide electrolyte will complete the cell. You will characterize your dye and cell via spectroscopy and determine your cell’s efficiency using a multimeter.
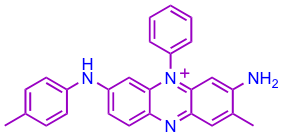
In 1856, William Perkin filed a patent for his aniline dye Mauveine (Figure 1), marking a key milestone in the development of commercial organic chemistry. While chemists had been noting colours and colour changes in substances for centuries, most investigations of these properties and transformations were purely for the sake of amusement. At age 18, while studying under August Wilhelm von Hofmann (of Hofmann Rearrangement fame), Perkin accidentally made a substance of a bright purple colour while attempting to synthezise the natural product quinine. As an amateur painter, Perkin had an interest in pigments and thus thought there might be commercial value in his newly discovered compound. While natural dyes such as madder and indigo had dominated the markets for centuries, the possibility of manufacturing dyes close to home was very attractive. Synthetic organic and inorganic dyes would quickly replace natural dyes, but with little regard for safety: dyes such as Scheele’s Green (acidic copper arsenite, named for Carle William Scheele) and Vermillion (mercury(II) sulfide) were extensively used until knowledge of their toxicity became widespread.
Organic dyes are useful in many applications other than the dyeing of fabric. One of the most important dyes known to humankind is chlorophyll, the green pigment found in most plants, algae and cyanobacteria 1. Chlorophyll is the pigment that allows plants to absorb light energy from the sun and harvest this energy via photosynthesis to produce sugars and oxygen from carbon dioxide and water.
Taking inspiration from nature, for hundreds of years humankind has been interested in manufacturing a device able to convert the sun’s rays into a usable energy source. Although we are not nearly as efficient as nature, much progress has been made in the development of solar cells. The foundations of this field of research were laid in 1839 with the discovery of the photovotaic effect; however, it was not until 1883 that the first photovoltaic cell was built by Charles Fritts. Fritts' selenium/gold based cell was only 1% efficient and expensive to produce; consequently, it was never commercially viable. Russell Ohl’s development of the p-n junction in 1941 paved the way for the development of silicon solar cells. This type of cell was first commercially produced in 1954 by Bell Laboratories and is now fairly common technology.
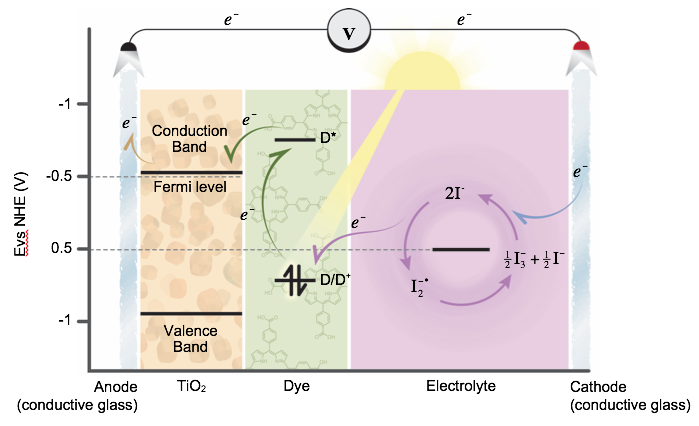
In this laboratory, you will construct a dye-sensitized solar cell (DSSC), also known as a Grätzel cell in honor of its inventor, Michael Grätzel 2-3. In traditional solar cells, the silicon semiconductor acts as both the light absorbing material and the charge carrier transport. In the DSSC these two tasks are separate. Here (Figure. 2), the light is absorbed by a sensitizer dye, which is connected to the surface of a semiconductor, in a process similar to photosynthesis. When light excites the dye, this results in a photo-induced electron injection from the dye to the conduction band of the semiconductor. The cell then collects this charge, thus generating electric potential. The dye is regenerated by a iodide/triiodide redox couple which is itself regenerated at the counter electrode by the electrons passing through the load. This process is catalyzed, generally, by a platinum surface at the counter electrode.
4-formyl benzoic acid (1.0 g, 6.7 mmol) was dissolved in 50 mL of MeOH at -7 °C (NOTE: Add NaCl to an ice bath to reach this temperature). Three equivalents of acetyl chloride were added drop-wise via syringe and the reaction was allowed to warm to RT while stirring. The reaction was allowed to mix for 24 hours. The mixture was evaporated to dryness and the solid that remained was taken up in DCM and washed 3 times with potassium carbonate. The organic layer was dried over magnesium sulfate and evaporated in vacuo. The solid was characterized by IR and 1H NMR (CDCl3).
NOTE: You will not have made exactly 2.30 g in the last step; adapt the following procedure, taking into account the amount of product you synthesized.
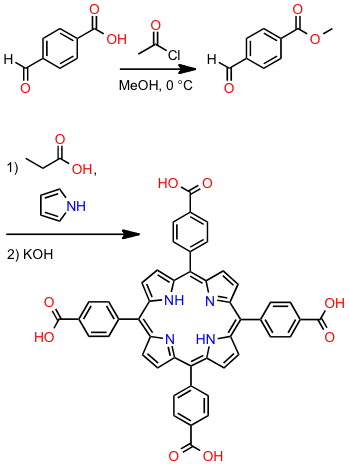
Methyl 4-formyl benzoate (2.30 g, 14 mmol) in propionic acid (50 mL) was heated at 120 °C. Freshly distilled pyrrole (1.0 mL, 14 mmol) was added, and the mixture was refluxed for 1.5 h, then stored at -3 °C in the freezer for at least 12 h. The purple precipitate was removed by filtration, thoroughly washed with cold methanol, and dried in vacuo at room temperature. The product was characterized by IR and 1H NMR (d-DMSO).
100 mg of 40TCPP was dissolved in 2:1 THF/methanol mixture (50 mL). A solution of 40% aqueous potassium hydroxide (6 mL) was added to the mixture and warmed at 40 °C for 30 minutes under magnetic stirring. The mixture was acidified with concentrated HCl. The four-test pH paper is not helpful in determining the pH of the solution; instead add the HCl dropwise until you start to see a hint of green in the product.
Warning
If you add too much acid, it will be very difficult to recover any product. Be very careful while adding and stop as soon as you see the first hint of green.
The product was extracted with chloroform (3 x 25 mL) after addition of water (40 mL). The joined organic fractions were washed with water (3 x 20 mL) Solvent was removed in vacuo to yield a purple solid. The product was characterized by IR and 1H NMR.
NOTE: The amount of TiO2 outlined in the following step will make enough for 4 solar cells; scale down if necessary.
To a mortar, add 2 g of TiO2. To this, add acetic acid in 1 mL increments, grinding with a pestle after each addition. Continue adding acid and grinding until the mixture is a white, milky, paint-like suspension. To this mixture, add 1 drop of clear liquid detergent, but do not grind. Make sure to allow the solution to rest and equilibrate for 15 minutes prior to use.
Lab staff will supply you with an ITO coated glass slide. Be sure to handle the slides with tweezers, wear gloves, and hold the slides by the edges. Prior to using the glass plate, clean it with ethanol and gently dry with a Kimwipe. Next, use a volt-ohm meter, set to ohms, to determine which side of the glass is conductive. The conductive side should give a reading of 10-30 ohms, while the other should give no reading. Apply four pieces of transparent tape to the face of the conductive glass plate to cover a 1-2 mm strip on three of the edges and a 4 mm strip on the fourth edge. You should use the tape that is stored on the consumables bench; if you are unsure if you are using the correct tape, check with a TA. The tape extending from the edge will be used to adhere the plate to the table. The tape will form a 40-50 micron deep channel into which the TiO2 solution can flow.
Put a drop or two of the acidified TiO2 mixture onto the plate and quickly spread the solution as evenly as possible by rolling a glass-stirring rod over the surface of the plate. Leave the plate to dry for a few minutes and then carefully remove the tape.
In order to anneal the plates, set the muffle furnace to 450 °C and allow to pre-heat for 30 minutes. Place the slide on a ceramic plate, then place the ceramic plate in the oven and let sit for 30 minutes. Once the annealing is finished, carefully remove the ceramic plate and place it on another cool ceramic plate. Allow the plate to slowly cool to room temperature before using.
Warning
Do not set the hot ceramic plate on the bench or on a oven mitt. It will burn both. Place on a cool ceramic plate. Be cautious around the oven, and do not touch the ceramic plates without oven mitts or tongs - hot ceramic looks like cold ceramic!In a glass container with a closable lid (i.e. a TLC chamber), make 30 mL of a 2 × 10⁻⁴ M solution of the porphyrin dye in ethanol. Take ~1 mL of this solution, and take a UV-Vis spectra of the dye; note the peak wavelengths. (Be sure to ask a TA for help with spectrometer.) Place the plate in the solution so that the TiO2 side is completely covered and allow it to sit overnight.
The next day, remove the plate form the ethanol-dye solution and allow it to dry. Prepare the counter electrode by coating the conductive side of another glass plate with the carbon catalyst from the soot of a candle flame. Hold the flame close to the glass without putting the flame out. Coat the plate lightly and evenly; you can verify the evenness of your coating by holding the plate up against a white backgrond.
Using two binder clips, sandwich the two dry plates are sandwiched together and offset about 2-5 mm (just enough to attach an alligator clip) to allow for the electrodes to be attached. Dip a Q-tip in the electrolyte solution and draw it along one side of the cell; capillary action will draw the solution in. There is no need to slide the plates back and forth, as this will dislodge the catalyst/TiO2 and dye).
Use the Vernier setup to generate an I-V plot of your solar cell. Instructions are posted with the setup. Determine the output characteristics of the commercial solar cell.
From the data you generated, provide an I-V plot of your solar cell. From this plot, the open circuit voltage and short circuit current can be obtained from the x- and y-intercepts, respectively. A graph of power vs. voltage should be generated to determine the maximum power output of your cell. From this information you should be able to determine the conversion efficiency of sunlight to electrical energy.
NOTE: This step is only necessary if no electrolyte solution is already available; check the consumables bench first!
200 mL of electrolyte solution was prepared. As only 1-2 drops of solution is used, this amount would be for the entire lab. 100 mL 0.5 M KI solution was prepared by adding 8.3 g KI to 100 mL water-free ethylene glycol. This solution was mixed with 100 mL 0.05 M I2 by adding 1.2 g I2 to ethylene glycol.
When you are finished with your solar cell, wipe off the electrolyte and dye/TiO2, clean with ethanol and dry. Pre-coated plates can be used again and should be tested for electrical conductivity before being stored individually.
Prepare your notebook as described in the Notebook handout in myCourses.
Scenario: Imagine you are a senior manager at Environment Canada. The Minister of the Environment, Catherine McKenna, is considering investing in research for the development of renewable resources. She has asked you to write her a one page letter describing the pros and cons of dye sensitized solar cells and she asks you if you would recommend investment in DSSC technology as a source of renewable energy in Canada. Remember to consider your audience; the Minister likely has very limited technical knowledge in this field.
For the Senior Associate Deputy Minister, Dr. Stephen Lucas, who does have technical knowledge in this field, prepare a complete long report (all sections of the lab report guidelines) outlining the important details of the synthesis of the dye, its isolation, and its identification. Detail any possible improvements in yield that could be achieved and explore other possible dyes that could be used in place of 40TCPP. Also describe the assembly of your solar cell, and the cell’s properties (voltage, current, efficiency) and describe ways to improve the cell. Remember to add graphs and diagrams where needed to make your report easier to follow; the associate deputy minister’s time is very valuable, so be concise!
You may choose to complete either a "Long" or "Short" report. Refer to the Lab Report Guidelines document on myCourses for detailed information on each section.